
Tutorial: Genome assembly and scaffolding of small eukaryotic genomes
Introduction
This tutorial can be used for the whole genome assembly and scaffolding of eukaryotic genomes. In this case, we will be using it for Oikopleura dioica, which has a haploid genome of ~50-70mb.
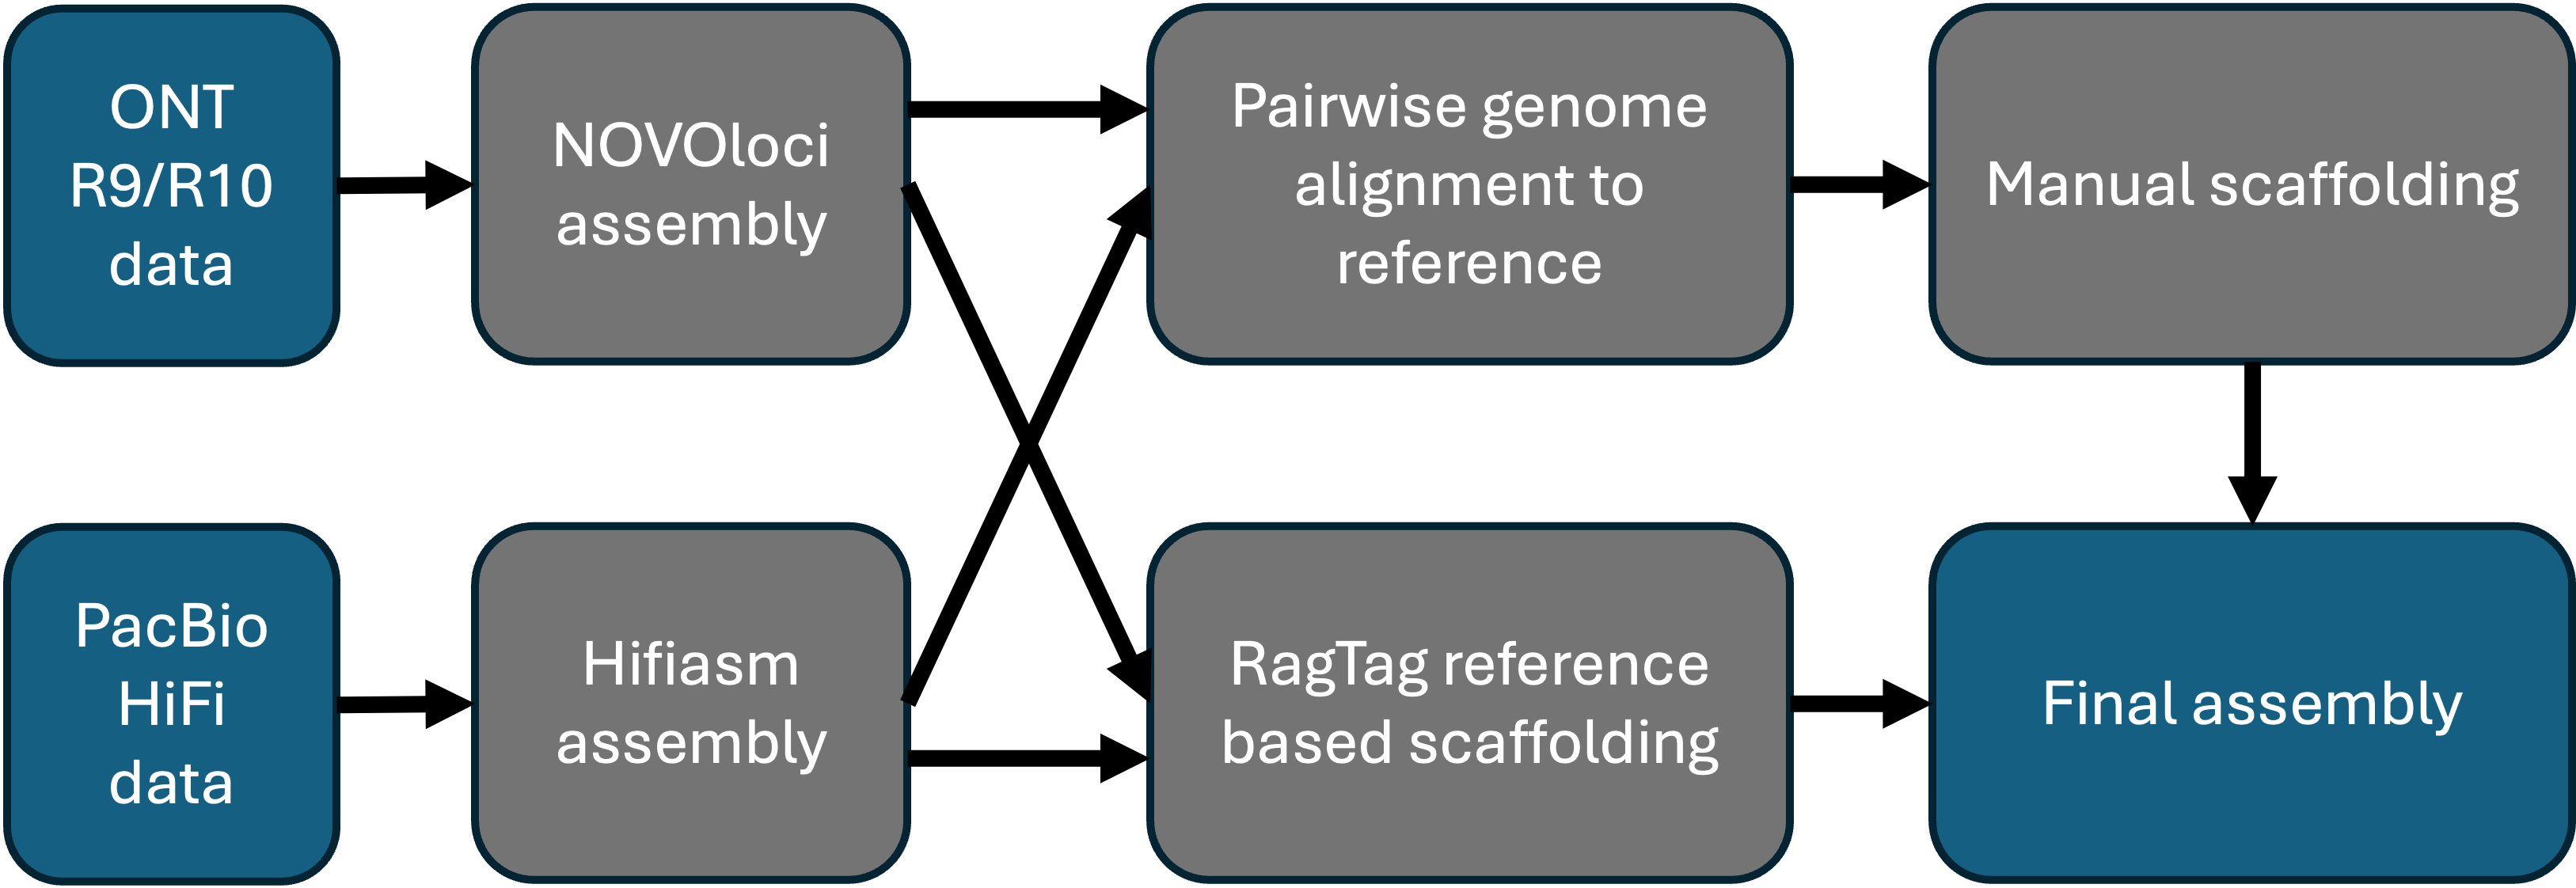
In this tutorial we will start with genome assembly, using either NOVOloci or hifiasm. NOVOloci is highly accurate but can only be used for small genomes (ideally <100Mb). On the other hand, hifiasm can be used to assemble larger genomes, but is not compatible with ONT R10.
In general, we use NOVOloci when assembling Oxford Nanopore Technologies or ONT (R9 & R10) data, as it is more accurate so far. We use hifiasm for PacBio hifi data.
The workflow is as following:
In this tutorial, I will be mostly working on the OIST HPC, so the modules part will only be applicable to OIST HPC.
Prerequisites
Fastq whole genome sequencing file, either from ONT (R9/R10) or PacBio HiFi.
Check your data before assembly
You need to check your data if it is good enough for sequencing. Some of the stats you need to see:
- Sequencing depth: more than 30X (2-3Gb) is ideal.
- N50: We have had success with ~3Mb N50 with 8Gb sequencing data (ONT R9, NovoLoci).
In general, you want the N50 to be high, and the size to be 30x of the expected genome size (15x per haplotype).
You can check this with seqkit:
$ ml bioinfo-ugrp-modules Other/seqkit # on Deigo
$ seqkit stats -a your_sequencing_data.fq.gz
Assembly
PacBio HiFi: hifiasm
To run hifiasm do the following:
Load hifiasm (using OIST HPC)
$ module load bioinfo-ugrp-modules hifiasm
Run hifiasm on your fastq file:
$ srun -pcompute -c64 -t4-0 hifiasm | tee logs.out
ONT: Novoloci
Novoloci is a more accurate assembler, but it is very slow. it is available here: NOVOloci on github. We use NOVOloci to assemble R9 ONT data, and now R10 ONT data for O. dioica.
To run, you should use a singularity image.
Before running, you need a config file which can be downloaded from the github page:
Project:
-----------------------
Project name          = odioica_assembly
Assembly length       = WG
Save assembled reads  =
Seed Input            =
Genome size           =
Ploidy                = 2
Circular              =
Threads               = 64
Output path           = /path/to/output_folder/
TMP path              = /path/to/temporary_folder/

Nanopore reads:
-----------------------
Nanopore reads        = /path/to/reads/
Local DB and NP reads =
Sequencing depth NP   = 30
R10                   = yes
Min read length NP    =

PacBio reads:
-----------------------
PacBio reads          = /path/to/reads/
Local DB and PB reads = /path/to/database/
Sequencing depth PB   =
Min read length PB    =
To run:
$ singularity pull docker://ndierckx/novoloci:latest
$ srun -pcompute -c64 -t4-0 singularity exec novoloci_latest.sif NOVOLoci0.1.pl -c config.txt
This will take more than 4 days to finish, so you might need to resume when the job dies.
Check your assembly
You should get the following files if you ran hifiasm: interpreting hifiasm output
and for NOVOloci, find a fasta file that has “final” within it:
assembly_final_odioica_assembly.fasta
Check if size is OK
Firstly, you want to check the size of your assembly. Ideally, you should get 2x genome size for Novoloci and 1x genome size for hap1/hap2/primary assembly of hifiasm. Data size is approximately the same with the size of the fasta file itself, and can be used to approximate the size of the assembly.
$ du -sh your_assembly.fa
For O. dioica, you should get ~60mb for the primary assembly, and slightly less for the second haplotype. For hifiasm you should have ~130mb.
Check statistics
Then you can use seqkit or bandageNG to check the basic statistics of the assembly.
Seqkit:
$ ml bioinfo-ugrp-modules Other/seqkit # on Deigo
$ seqkit stats -a your_assembly.fa
bandageNG:
$ ml bioinfo-ugrp-modules Other/bandageNG
$ bandageNG your_assembly.fa
For seqkit, you should get something like this:
file format type num_seqs sum_len min_len avg_len max_len Q1 Q2 Q3 sum_gap N50 Q20(%) Q30(%)
./your_assembly.fasta FASTA DNA 44 134,911,158 17,713 3,066,162.7 11,878,310 385,147 1,892,152.5 5,078,478 0 5,379,396 0 0
You should look at the num_seqs, usually for O. dioica, you expect at best 14 contigs excluding the mitochondrial genome. Usually, less than 100 contigs with Novoloci mean that the assembly is very good. You will expect more contigs with hifiasm.
Scaffolding part 1: Comparing assembly to reference
Is mitogenome present?
Usually, we don’t see mtDNA in our ONT runs, but we do see them in hifi runs. We want to firstly try to see if there is any contig that contains the mtDNA.
To do this, you can do a tBLASTn search of cytochrome c oxidase subunit 1 from other O. dioica. Don’t forget to specify the genetic code to the ascidian genetic code (table 5). You can use the following protein for the BLAST: link
Are telomeres present?
You want to check if telomeric regions are present in the assembly. This information may be important in determining the orientation of the contigs.
There are many ways to do this. I made a python script to do it: find_telomeres on github
Pairwise alignment to reference
Even if the assembly does not seem to be good, it is worth aligning to a reference genome to decide if it is worth scaffolding.
For this, we are going to use Charles’ pairwise genome alignment pipeline:
$ nextflow run oist/LuscombeU_nfcore_pairgenomealign_fork -r milestone_2.1.0_beta \
    --input ./input.csv \
    -profile oist --m2m \
    --target ./reference.fa \
    --dotplot_options '--rot2=h --rot1=v --sort2=1 --strands2=0' \
    --outdir ./results --dotplot_width 2000 --dotplot_height 20000 \
    -w work
Where the input.csv is:
sample,fasta
YOURASSEMBLY,YOURASSEMBLY.fasta
Some of the files should look like this in the results:
target___YOURASSEMBLY.m2o_plt.png
target___YOURASSEMBLY.o2o_plt.png
You should look at the m2o (multiple to one) and o2o (one to one) plot as such (m2o):

This shows the alignment of contigs (left side) and the reference (top side).
If it is blue then the contig is inverted, also take notes so that you know which contigs belong to which based on the reference.
You should also do self-alignment and see if any of the contigs overlap each other, and you can go to the next step.
How about overlapping contigs?
For overlapping contigs, we can perform manual alignment of the contigs and try to determine where they overlap. Some of the tools that can be used here: MUMmer, BLASTN, or the mauve alignment tool on geneious. Take note of the position of the alignment for merging contigs later.
Assigning contigs to chromosomes
Using this information, you should know which contigs go to which chromosome, and in which direction. You should now record this information for creating the final files.
Scaffolding part 2: creating the chromosome fasta files
Now this is where things may get a bit tedious.
for these, we will use the emboss suite:
$ ml emboss
1. Create individual fasta files for each contig
We need to split the assembly into individual
$ seqretsplit your_assembly.fa
We usually add 100N when there are gaps, and 1000N to represent centromeres:
$ (echo ">1000N"; printf 'N%.0s' {1..1000}) > 1000N.fasta
$ (echo ">100N";  printf 'N%.0s' {1..100})  > 100N.fasta
Now you should have one fasta file per contig.
2. Merging contigs into one fasta file per chromosome
Now, we make USA files (USA file description). Each USA file correspond to each chromosome, we start with the short arm.
This is an example USA file Chr1.USA:
ctg1.fa
1000N.fa
ctg2.fa[::r]
ctg3.fa[100:1000:]
ctg4.fa[100:]
This means that ctg1.fa is the short arm of Chr1, followed by 1000N, and followed by reversed ctg2.fa, ctg3.fa (100bp to 1000bp), and ctg4.fa (100bp to end).
Just as a note, we usually use the following chromosome naming:
- chr1
- chr2
- YSR
- PAR
- chr1_alt
- chr2_alt
- PAR_alt
- MT
where alt is for the alternative assembly.
Now that you have the usa files, you just have to create fasta files per chromosome as such:
For one USA file:
$ union -sequence @chr1.usa -outseq chr1.fa
$ sed -i '1s/^>.*/>chr1/' chr1.fa
Do everything at once:
for usa in *.usa; do
  name=$(basename "$usa" .usa)
  union -sequence @"$usa" -outseq "${name}.fa"
  sed -i "1s/^>.*/>${name}/" "${name}.fa"
done
3. Merging into final scaffolded assembly
Now you should have one fasta file per chromosome + unplaced contigs.
You now need to concatenate all these fasta files. One way is to use cat.
$ cat chr1.fa chr2.fa > YOURSPECIES_primary_assembly_v1.0.0.fa
Or you can make another USA file as such (e.g. primary_assembly.usa)
chr1.fa
chr2.fa
PAR.fa
XSR.fa
YSR.fa
and perform union:
$ union -sequence @primary_assembly.usa -outseq YOURSPECIES_primary_assembly_v1.0.0.fa
Scaffolding part 3: If your assembly is very close to a reference assembly
Use RagTag: RagTag on github
RagTag does super well when the reference assembly is very similar to the assembly.
Tips
- Use the following priority for deciding the primary vs alternative assemblies
- Longest, unfragmented contig
- Telomere presence
- When contigs overlap, use the larger contig
One of our better documented assemblies (only for OIST members): link